Under the group LS Retail - Web Integration - Administration - Web Store there are several features. This group handles all settings and configurations for the nopProducts for the LS eCommerce Web Store that are irrelevant to the associated standard LS Retail Item.
This section describes the creation and modification of a nopProduct, and the interaction between it and the associated Retail Item.
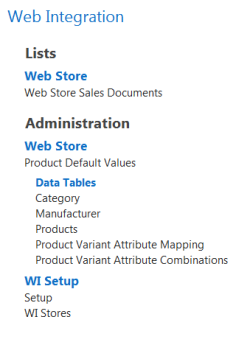
Regarding the LS Central infrastructure and functionality, the LS Omni e-Commerce Web Store is no different from any other store with regard to manipulating a Retail Item. In LS Central, the Distribution Groups decide in which stores an Item is sold. A Retail Item can be sold in more than one store.
Creating a nopProduct
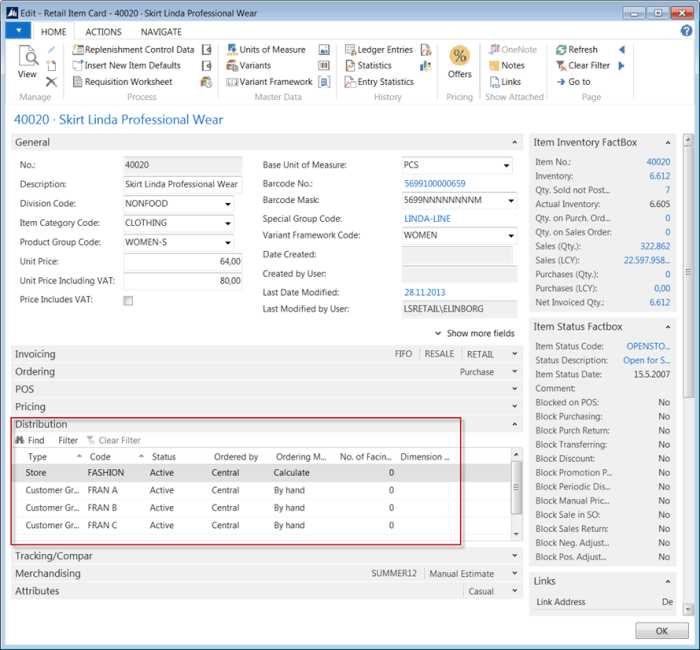
The information related to the nopProducts is kept in a set of tables that form a layer between the standard LS Central solution database and the LS Omni e-Commerce Solution database, from here on referred to as the nopDatabase. The information from these tables is then replicated to the LS Omni Database. Hence, when you want to create or update a nopProduct, relevant entries in the middle layer data tables need to be created or modified accordingly. Under the group LS Retail - Web Integration- Administration - Web Store - Data Tables, the administrator can view the middle layer data tables.
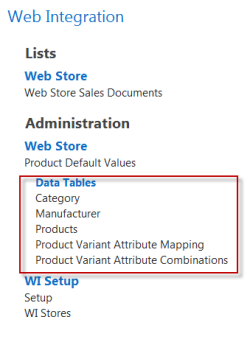
The nopProduct information can come from two data sources, from the associated Retail Item, or the Product Default Values page. Read about the the functionality of the Product Default Values.
On the WI Setup page there are two action buttons to manually create and reset the nop Data. These actions are both parts of codeunit (10012900) WI LS Mgt. The function LS Retail - Web Integration - Administration - WI Setup - Setup - Clear Data for Replication deletes all entries for all the nopProducts in the middle layer tables; that is, all the data that is replicated into the NOP database, and resets the field Web Store Last Action Entry No in the WI setup.
![]()
The rest of this section deals with the codeunit that creates and updates the nopProduct data in the middle layer tables.
Tip: The middle layer tables are empty in the Demo Data. The user must run the codeunit that creates the nopProduct data to populate the tables prior to running the normal job.
The nopProduct data is generated via codeunit (10012900) WI LS Mgt. This codeunit can been run as follows:
- Using a scheduler job, creating actions on nopProducts that are new or where data has changed. When the codeunit is run by a scheduled job, it updates the middle layer tables by the following actions/pre-actions according to the WI Setup, Web Store Last Action Entry No: on the underlying retail item data tables:
(27) Item
(5401) Item Variant
(10000704) Item Distribution
(10001412) Extended Variant Dimensions
(10001411) Item HTML
(10001413) Extended Variant Values
(10001414) Item Variant Registration
![]()
Note: Changes in the Product Default Values create pre-actions on the Item table. For more information on the scheduled job, see the section on Job.
Product Default Values
Under the group Web Store you find the Product Default Values page:
On this page, you can set a default value hierarchy for nopProducts. That is; one can:
- Set default values for a nopProduct on an Item, Product Group or Item Category level
- Select primary Variant Dimension for a nopProduct
- Select default values for Web Store Presentation Type
The following subsections will describe these three configuration hierarchies in detail.
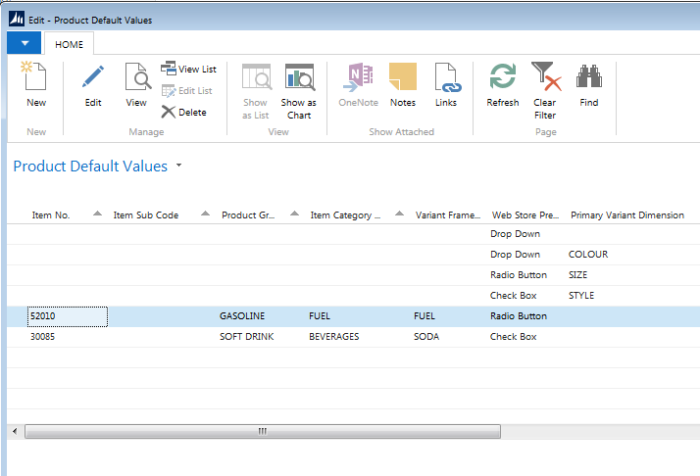
The following image shows the Product Default Values.
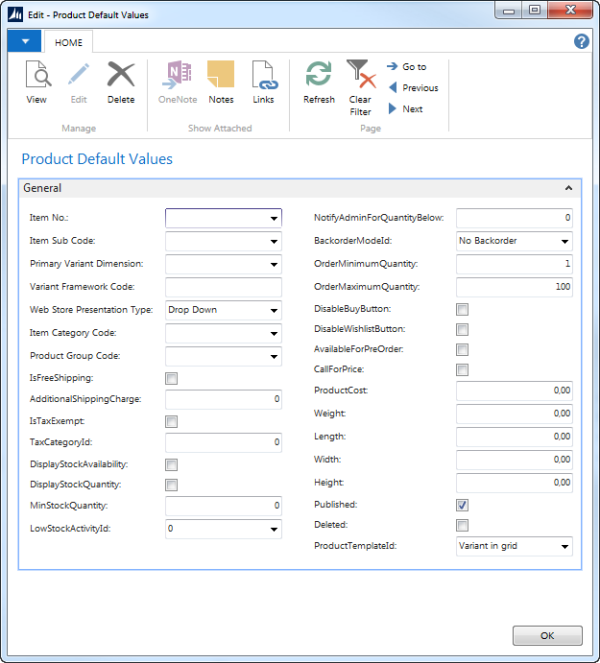
The first seven fields in the first column of the Product Default Values card make the primary key of the table. Their values are discussed in detail in the following subsections. Below are comments on the values that are important for the remaining fields:
- IsShipEnabled: If this field is marked as “false“, you are not able to ship the product.
- AdditionalShippingCharge: Can be added to the shipping price, if this product is more expensive to ship than others.
- IsTaxExempt: Used to decide if taxes should be calculatedor not; this is not supported in LS Central.
- TaxCategoryId: Not supported in LS Central; should be set to Zero.
- DisplayStockAvailability: If check-marked, stock availability is shown on homepage
- DisplayStockQuantity: If the check box is selected, stock quantity will be shown on the homepage.
- MinStockQuantity: The quantity for which you would like to trigger an event like disable buy button.
- LowStockActivityId:
- Nothing = 0
- DisableBuyButton = 1
- Unpublish = 2
- BackOrderModeId:
- No Backorder = 0
- AllowQtyBelow0 = 1
- AllowQtyBelow0AndNotifyCustomer = 2
- OrderMinimumQuantity: Minimum quantity that the customer can buy; default value should be 1.
- OrderMaximumQuantity: Maximum quantity that the customer can buy; default value should be 100.
- DisableBuyButton: Indicates whether the Buy button should be disabled on the page or not.
- DisableWishlistButton: Indicates whether the Wish list button should be disabled on the page or not.
- AvailableForPreOrder: Is the customer allowed to order the item if is out of stock? Not currently supported in LS Central.
- CallForPrice: Price is not shown on the page, the customer gets a message that he or she needs to call the store for price
- Weight, Length, Width and Height: Information about the size of the package.
- Published: Select this check box to publish the product.
- Deleted: Select this check box to mark the product as deleted.
- ProductTemplateId: Variant in Grid, Single Product Variant.
Default values hierarchy
In this section we will describe the hierarchy that sets default values for nopProducts/LS Retail Items.
The primary key in the page’s underlying table is “Item No., Item Sub Code, Item Category Code, Product Group Code, and Primary Variant Dimension”. All these fields can be empty, and if the table is empty, an entry with all key values empty is created in open page. Hence, when editing these fields in an entry, you get a message that a record is being renamed.
The value of the last field in the key, “Primary Variant Dimension” has no relevance to the hierarchy described here. However, it plays a key role in the second hierarchy mentioned above. Let us state the hierarchy from bottom down in the following table.
| Importance | Item No. | Item Sub Code | Item Category Code | Product Group Code | Primary Variant Dimension |
|---|---|---|---|---|---|
| 1 | Value | Value | The Value related to the “Item No.” | The Value related to the “Item No.” | Possibly some value related to “Item No.” |
| 2 | Value | Empty | The Value related to the “Item No.” | The Value related to the “Item No.” | Possibly some value related to “Item No.” |
| 3 | Empty | Empty | Value | Some Value related to the “Item Category Code” | Empty |
| 4 | Empty | Empty | Value | Empty | Empty |
| 5 | Empty | Empty | Empty | Empty | Empty |
Tip: LS Central assumes that the last line, no 5, exists. Remember this line is initially created on page open.
The Product Group Code has no meaning if the Item Category Code has no value. Also, if the Item No. is not empty, these item values are filled in accordingly by default on creating an entry.
Example: Item Sub Code can take on any value of the item’s variant framework.
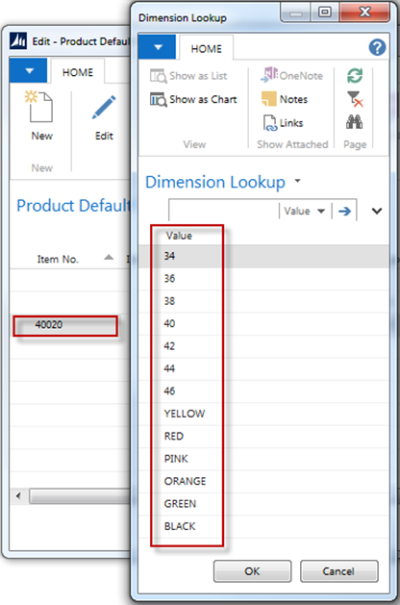
The subcodes for Item 40020, Linda skirt, have the variant dimensions COLOUR and SIZE, hence the possible values for “Item Sub Code” are the colors BLACK, GREEN, ORANGE, PINK, RED and YELLOW, and the sizes 34, 36, 38, 40, 42, 44 and 46. Hence, if you for example want to remove yellow skirts, or skirts size 46 in all colors you can create a template to do this by selecting appropriate item and subcode, and then setting the field Published as FALSE.
 s
s
The next two images show how it is displayed when the product has the Primary Variant Dimension set to as STYLE:
Example: If you want free shipping for all items in women’s clothing, you could make a template with Item Category Code CLOTHING and Product Group Code WOMEN-S and set the value of IsFreeShipping to TRUE.
Primary Variant Dimension
In this section, we will describe the configurations of the nopProduct’s Primary Variant Dimension. Towards the user, the Primary Variant Dimension has to do with the display of the product in the web store.
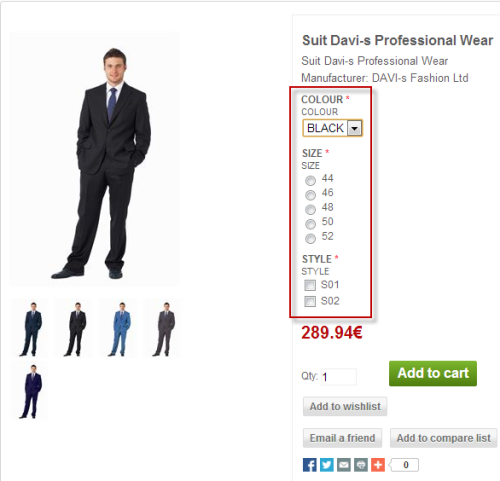
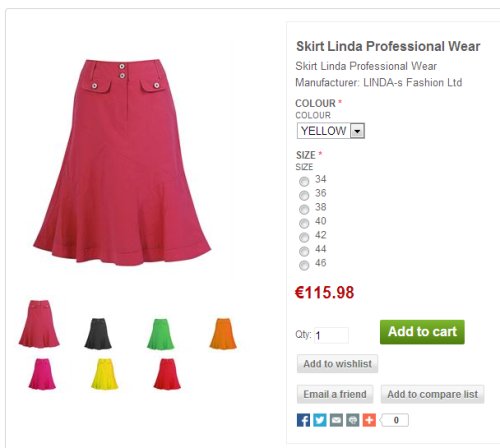
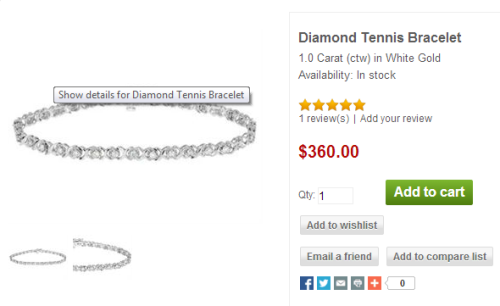
Example: Let us consider a nopProduct the associated Retail Item of which has three variant dimensions, COLOR, SIZE and STYLE. The following image shows how it is displayed as it has no Primary Variant Dimension
The primary structural change between nop3 and nop3.1 is that a product does not necessarily need to have a primary variant.
Tip: The default is that a nopProduct does not have a Primary Variant Dimension.
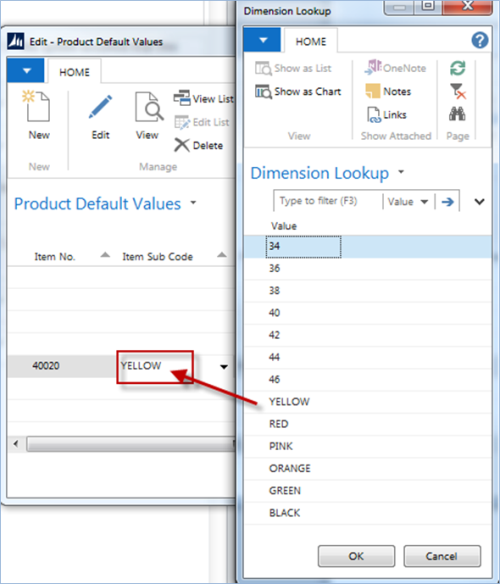
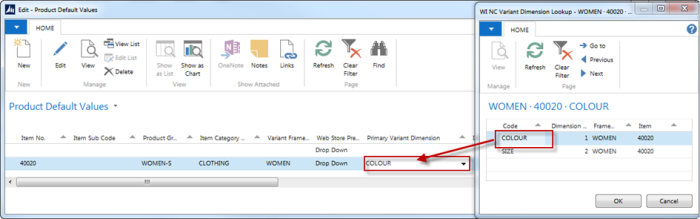
If you want a nopProduct to have a primary variant, it is selected in the following way in the Product Default Values page:
- Create/or edit a line for the Retail Item you have in mind.
- Drill down into the Primary Variant Dimension field. A Lookup opens that displays the available variant dimensions according to the Retail Item’s Variant Framework.
On creating a new entry with empty Primary Variant Dimension, the default value for ProductTemplateId is Variant in Grid. However, if a nopProduct has a Primary Variant Dimension selected, it needs to have selected ProductTemplateId = Single Product Variant. Hence, when a Product Variant Dimension is selected, the ProductTemplateId is updated accordingly.
On creating a new entry in Product Default Values with a nonempty Item No. field, the fields for Product Group Code, Item Category Code and Variant Framework Code get the value from the item. If another entry exists for this item with Primary Variant Dimension selected, the new line gets the same value for that field. That is; two entries for same item need to have the same Primary Variant Dimension.
Web Store Presentation Type
The Web Store Presentation Type decides how a nopProduct’s attribute value (Business Central variant dimension) is displayed in the web store.
You can set a default value for a nopProduct’s attribute value in all variant frameworks by creating an entry in the Product Default Values page with all key values empty except the Primary Variant Dimension field which is used here to define the attribute value. In the case where all primary key values are empty and you open the lookup for the Primary Variant Dimension, the lookup displays all possible values from table Extended Variant Dimensions (10001412).
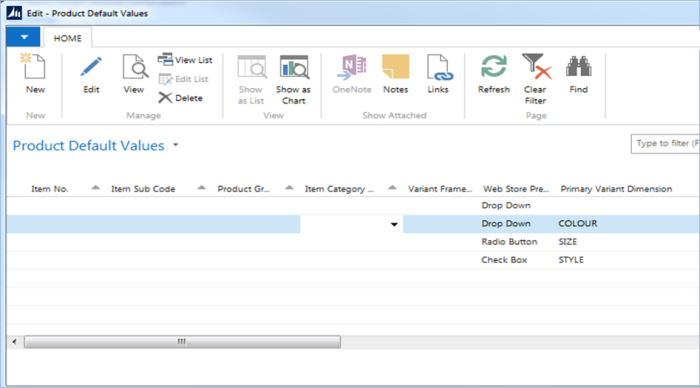
Example: The framework in the following picture states that if a nopProduct has attribute value (that is; the Retail Item’s variant framework contains the following dimensions)
COLOR, its value will be selected via a drop down in the web store
SIZE, its value will be selected via Radio Buttons in the web store
STYLE, its value will be selected via Check Boxes in the web store
Example: If a nopProduct has attributes, but none of them stated in the Product Default Values page (the associated Retail Item has a variant framework that does not include these dimensions), then the attribute values are selected via its Web Store Presentation Type if there is an entry in Product Default Values for the item. Otherwise it is selected via the Web Store Presentation Type for the default framework (the one with all the values in the primary key empty).
In the image below we see an entry for item 52010. Its variant framework is FUEL, which does not have Web Store Presentation Type default value defined. Hence, its attributes are selected via a Radio Button. The entry for item 30085 is similar. Its variant framework SODA does not include COLOUR, SIZE or STYLE, hence its attributes are selected via checkbox.
On creating new entry, the Web Store Presentation Type is assigned the value of the Web Store Presentation Type in default framework with all the values in the primary key empty.
nopProduct Web Store Description
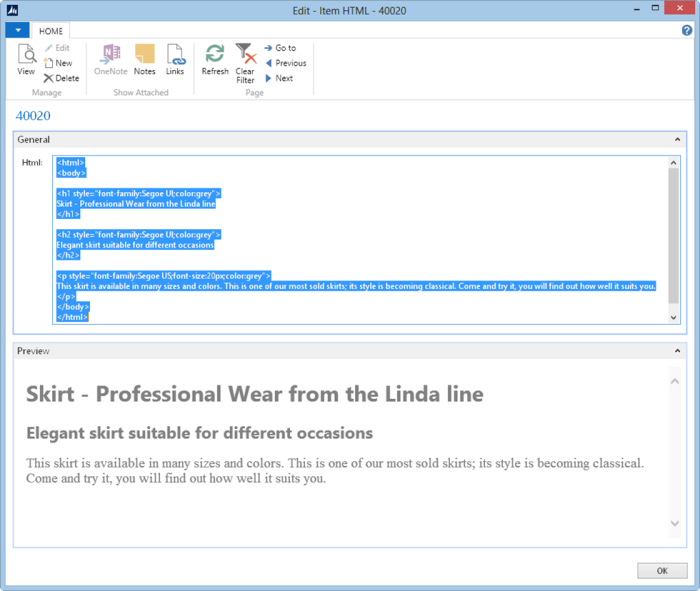
On the Retail Item Card, descriptions of each item can be added in an HTML editor. The editor is opened by selecting the Item HTML icon on the Navigate tab of a Retail Item Card for the item in question.
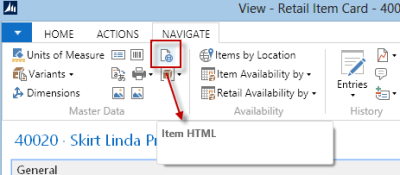
In the editor, the text is entered and previewed:
Product Prices
In Business Central, prices are set on item or item’s variant level on the Retail Item card, the Pricing tab, via the Retail Items page. Products in the web store are displayed with the item price except possibly in one case. This is when the item has one variant dimension, and that dimension has been selected as the Primary Variant Dimension. Hence, the item is displayed on variant level and the product is displayed with the variant price, if any. Otherwise it is displayed with the item price.
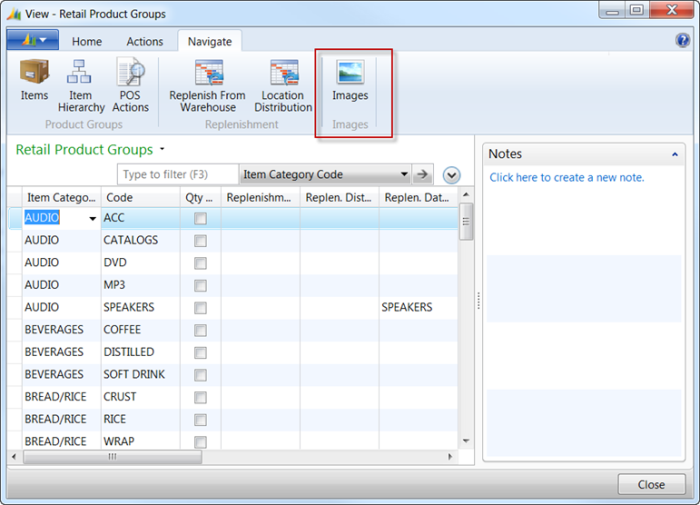
Images for nopProduct and Attributes
In LS Central, images can be added to a Retail Item and its variants. This is done on the page (Retail Image Link List (99009082)). To access this page for Retail Item or Variants, start by opening the Retail Item card via the Retail Items page. Then go to Navigate >Master Data. Adding an image to:
-
Retail Item - Click on the Image icon. Then the Retail Image Link List page opens. There you can add image to the Retail Item. If you want to add more than one image, the Display Order decides the order in which they are displayed in the web stores. For example the one with the lowest Display Order will be in focus when the item is accessed in the web store.
-
Variants - Select Variants from the Variants-drop down. The Item Variants page opens. There you select Navigate > Images and the Retail Image Link List page opens.
Tip: The page allows the user to select more than one image, but the one used in these cases needs to have Display Order = 0, which is the default value. If more than one image has Display Order = 0 the first one in the list is used.
It is assumed that the user is selecting image for the first variant dimension group.
Example: You want to add an image to Retail Item 40020, Linda Skirt that has variant dimension one as COLOUR and variant dimension two as SIZE. Below we add a link to images for all variants that represent yellow skirts.
- On the Retail Item Card at Retail Items, select the Retail Item 40020, Linda Skirt.
- On the Retail Item Card on the Home action menu, click Variants. A list of variants for the product appears. Select one of the variants representing a yellow skirt.
-
An image for the variant can be selected by going to the Retail Image Link page (click Images on the Navigate action menu.
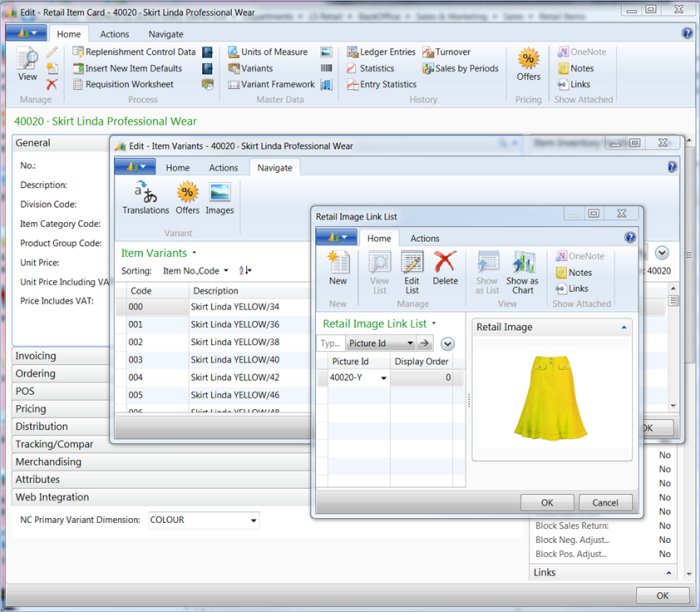
-
To enter an image for a variant, click New on the Real Image Link List card. In an empty line in the Picture ID column you can access an image in the database and select the one you want to use. The selection will be valid when you go to another line but the image will only appear on the card the next time you enter it.
Tip: Note that when you enter the image initially it is assumed that the user is selecting an image for the first variant dimension.
Example: Let’s add an image to the variant Skirt Linda YELLOW/34, Variant Code 000. Then the system suggests that the user adds the same image to all variants in the dimension YELLOW.
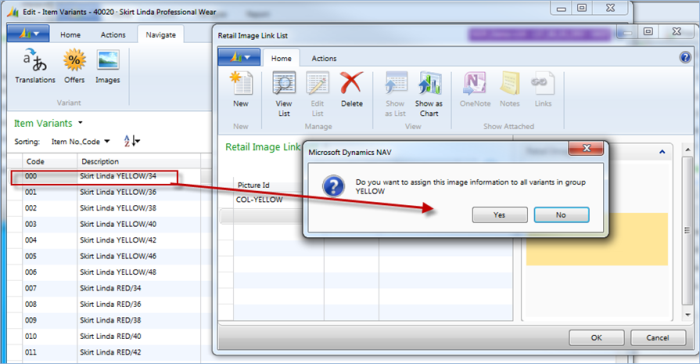
- If the user deletes the image from one of the variants, the system suggests that the image is deleted for all the variants in the dimension.
A nopProduct that is an associated Retail Item has variants. The images linked to the variants are used to visualize the nopProduct attributes that correspond to the first variant dimension in the Retail Items variant framework. The images are displayed in the following way
nopProduct with no attributes: The images selected for the item are displayed as before. The one with the lowest Display Order is in focus, and the other ones are displayed smaller, according to the display order.
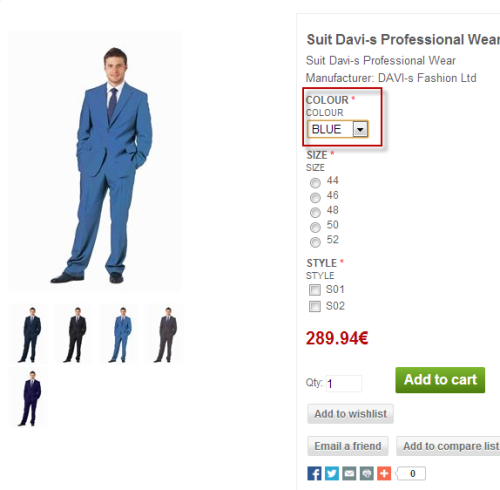
nopProduct with attributes: If there are images linked to the item‘s variant, the ones linked to the first dimension in the variant framework are assigned to the relevant attribute. These images are then also linked to the nopProduct behind the scenes in LS Central. The result in the web store is that the images are displayed as for a nopProduct with no attributes, (see the example above), but when an attribute value in the corresponding first variant dimension is selected, the image in focus changes to the one that is linked to that value.
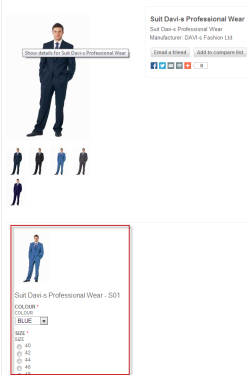
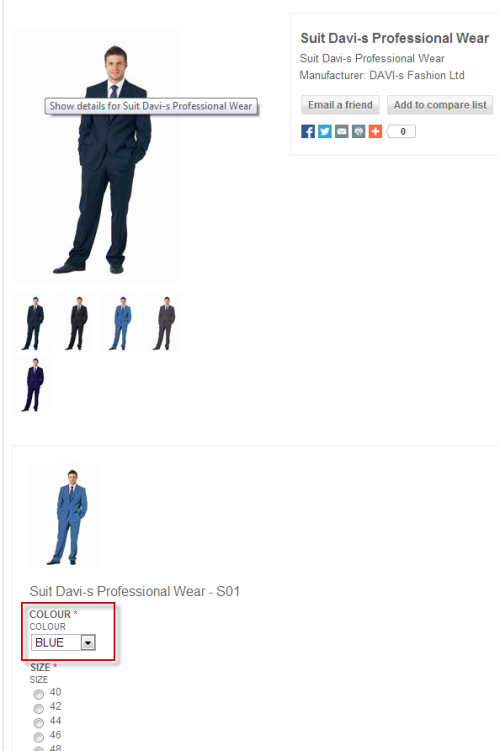
Example: Suite Davi-s Professional Wear (Retail Item 40060) has COLOUR as its first variant dimension. Hence if one selects a value for the attribute COLOUR, the image in focus changes. Here, BLUE has been selected and the image of blue suits is in focus:
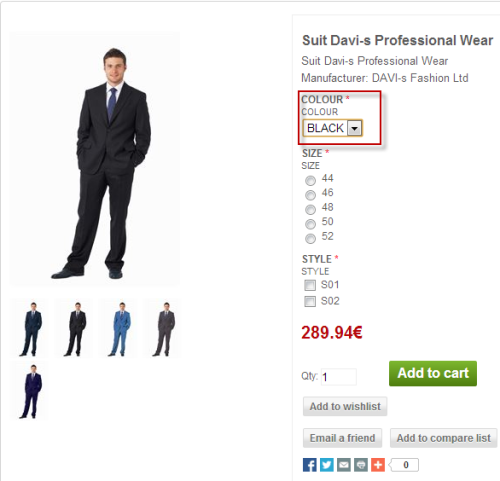
In the example below, however, BLACK has been selected and the image with black suite are in focus:
Variant nopProduct with Primary Variant: As for nopProduct with no attributes, the images linked to the Retail Item and the attributes are displayed at the top of the page in the web store alongside the general information about the nopProduct. Below, each value of the Primary Variant Dimension gets its section. If the Primary Variant Dimension is not selected as the first variant dimension, and there have been selected images for that dimension in Business Central, the image will change when different values are selected.
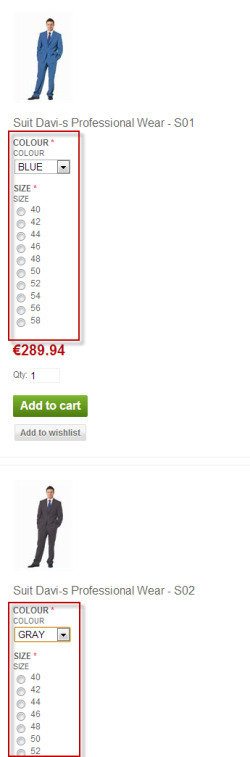
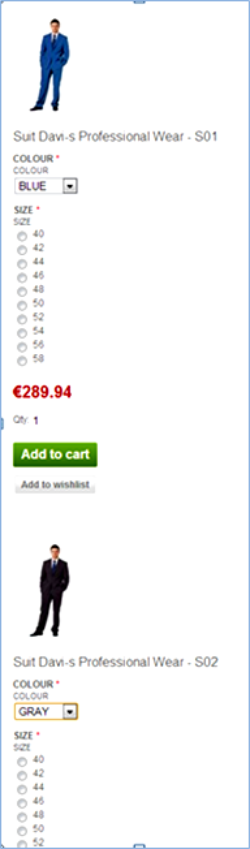
Example: Here the Primary Variant Dimension is selected to be STYLE and the first variant dimension in the framework is COLOUR. That is, they are not the same. In the following image we see that for the Primary Variant Dimension-value STYLE S01, the color BLUE has been selected. Hence, the image for the attribute has changed to blue suit. Note, that you do not see all the images for the attributes as for the nopProduct itself.
The following image shows the presentation of STYLE attributes S01 and S02.
Images for Item Categories and Product Groups
The user can add an image for Item Categories and Product Groups. This is done on the same page (Retail Image Link List (99009082)) that the user adds an image to a Retail Item and its variants. To open the Retail Image Link List and link image to:
Item Category: Go to the Retail Item Categories page. This page can also be accessed via the Retail Item Card by drilling down to Item Category Code field. Then go to Navigate >Images.
Product Groups: Go to the Product Groups page. This page can also be accessed via the Retail Item Card by drilling down to the Product Group Code field. Then go to Navigate >Images
In the Retail Image Link List you add an image link in the same way as the links to Images and Variants.
Tip: The page allows the user to select more than one image, but the one used in these cases needs to have Display Order = 0, which is the default value. If more than one image has Display Order = 0 the first in the list is used.
Job
One Scheduler Job is needed to take care of data replication from Business Central to e-commerce:
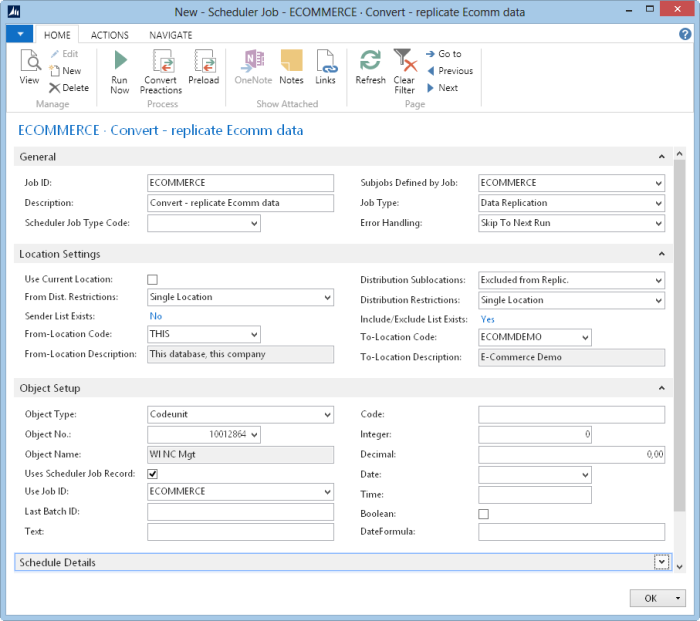
This job takes care of all data conversion and replication to the e-Commerce database. When the field Web Store Last Action Entry No: on the WI Setup page is zero the job is processed as normal job which ends in setting the field to the highest Preaction entry no. After that the job is processed as By Action starting where the Setup field points to. The “WI NC” –tables are updated to reflect the data replicated to the e-Commerce database.
Sales Orders
After Order Confirmation and Payment confirmation in NOP, a standard Sales Order is created in LS Central with the web service WI_NC_CREATE_ORDER. The Customer can see the Order Status in NOP using the web service WI_NC_ORDER_STATUS.
When a purchase takes place in the web store, a standard Business Central Sales Order is created. This Sales Order is created with Nav Document No. which is a code- variable, but in the web store it has a NOP Order Number which is an integer. So to find the Orders in LS Central, access it and see its status and shipping status on the NOP Order Number. We have the page Web Store Sales Documents.
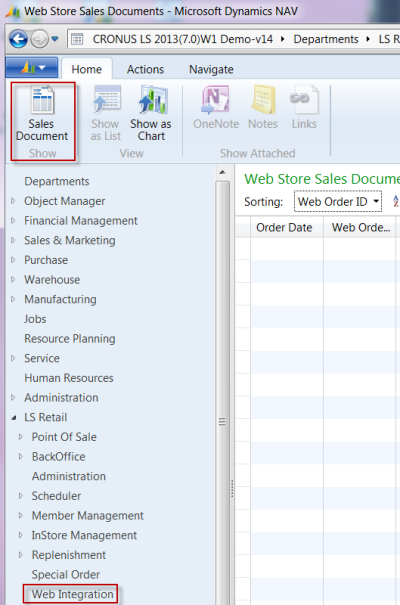
When a Sales Order is posted, a Retail Posted Sales Invoice is created on a new Document No. and the original Sales Order does not exist anymore. This information is updated on the page and the action “Sales Document” shows the relevant sales documents for the selected line.
Order Status:
- Pending: When the Sales Order is created it gets the Order Status Pending by default. A Sales Order that has been released can get the Order Status Pending if it is reopened.
- Processing: When the Sales Order is released, it gets the Order Status Processing.
- Complete: A Sales Order that is posted gets the Order Status Complete.
- Canceled: If a Sales Order is canceled it gets the status Canceled.
Shipping Status:
- Not required: If shipping is not required.
- Not shipped: None of the items in the order have been shipped.
- Partially: Some of the items in the Sales Order have been shipped and some not.
- Shipped: All items in the order have been shipped.
- Delivered: All the items in the order have been shipped and delivered.
Initially the order has the status Pending but when Sales Order has been created from the basket in LS Central using web-services, it will enter the status Not Shipped; Partially Shipped, if a part of the order has been shipped; Shipped and Delivered, only if the order has reached the Order Status: Complete.
Shipping Requirements
Standard Business Central functionality is used for shipping. Retail Sales Order is created in Business Central.
Out of Stock Orders
It is possible to buy variant items in the web store even though it is not available in stock. It is assumed that it will be in stock when the order is ready for delivery. If that is not the case then it is the Back Office’s role to contact the buyer with further information. It is also possible not to allow this and a setting TRUE/FALSE in the code decides which is used.
This means that Out of Stock Orders are allowed for products with variants in e-commerce. This is handled in the Codeunit WINCProductVariantAttrComb_p.AllowOutOfStockOrders:= TRUE; and can be changed there to FALSE if another approach is preferred.
Canceling Orders
- If the customer wants to cancel orders, it is not done in the web store directly. It has to be done in the back-end so the customer contacts the Head Office or Store by e-mail or phone and the staff on that end does the cancellation manually in the system.
- What the customer can do at all times is to view the status of the order and stages. Therefore, it is possible to check the status at all times, for instance if the order has actually been canceled.
-
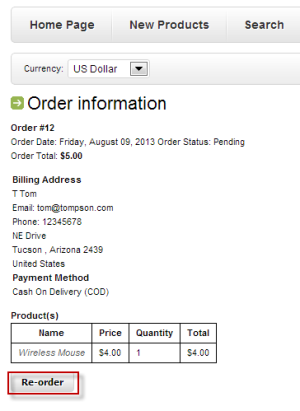
When viewing an earlier order it is possible to reorder the same item(s).
See Also
User Buying Goods in the Web Store